
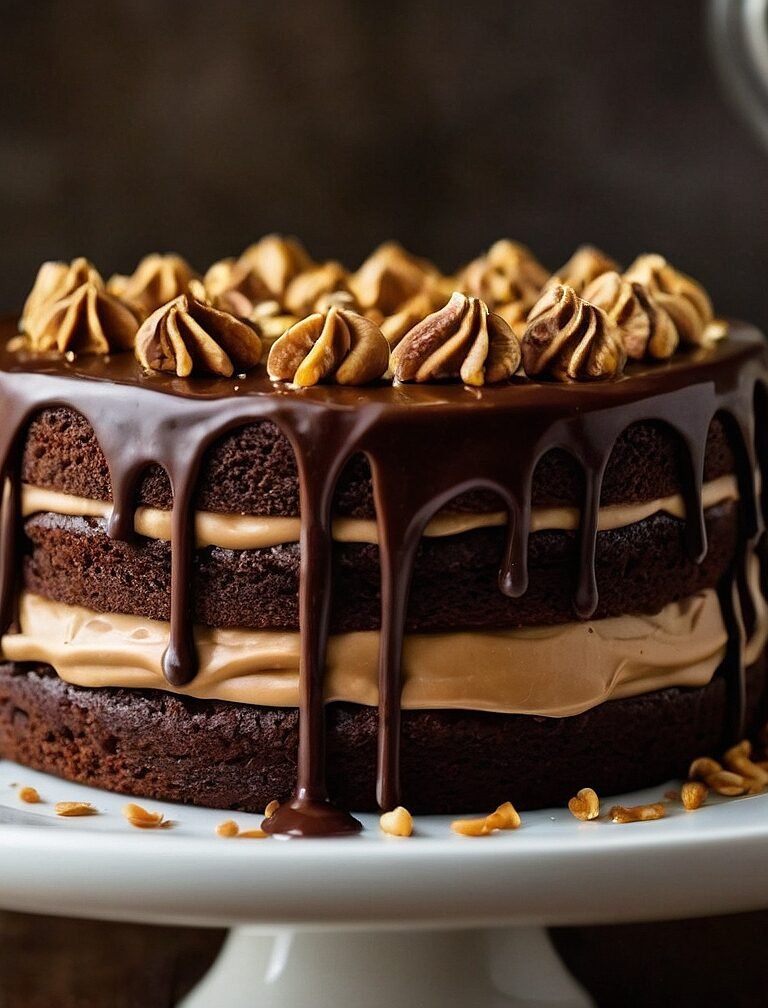
Indulge in the divine union of rich dark chocolate and creamy peanut butter with this irresistibly moist cake. Layered with peanut butter frosting and enveloped in semi-sweet chocolate ganache, each bite is pure bliss. Prepare to be enchanted from the very first taste—it’s a love story in every slice.
Introducing our latest heartthrob: the Dark Chocolate Peanut Butter Cake. This cake is luxuriously rich—think ultra-rich, perhaps even deserving the title “filthy rich.”
Here’s What Makes This Peanut butter chocolate cake Irresistible
- The cake crumb boasts a fudgy and moist texture, yet remains delicately light and spongey.
- Chocolate chips add an extra layer of texture that you won’t want to miss out on. Trust me, taste testers have raved about how they provide a delightful contrast to the velvety frosting and cake, and I wholeheartedly agree.
- The peanut butter frosting delivers an explosion of flavor that’s sure to impress.
- While the cake is undeniably sweet, it’s not overwhelming. The subtly sweetened peanut butter frosting and rich dark chocolate ganache offer a welcome departure from overly saccharine buttercream.
- Indulge wisely, as this layer cake is undeniably decadent and meant for special occasions.
Breaking Down the Chocolate Peanut Butter Cake into 3 Key Components
- Dark Chocolate Cake: We begin with the same cake batter used in our popular dark chocolate mousse cake and chocolate raspberry cake. This tried-and-true batter is enriched with sour cream for a denser, more resilient cake structure, ideal for building tall and sturdy layers.
- Peanut Butter Frosting: Spread a luscious layer of creamy peanut butter frosting between each cake tier and use it to apply a crumb coat to the cake’s exterior. This frosting recipe is an enlarged version of our original peanut butter frosting, ensuring ample coverage and flavor.
- Chocolate Ganache: Finish off the cake with a decadent topping of semi-sweet chocolate ganache. While the cake was initially frosted with chocolate buttercream, feedback from taste testers highlighted its overwhelming richness and sweetness. By switching to chocolate ganache, we strike a perfect balance, resulting in a cake that’s irresistibly indulgent yet delightfully palatable.
A Cake Bursting with Intense Chocolate Flavor
To create the cake batter, gather a handful of essential baking ingredients. Both sour cream and buttermilk are essential for providing the necessary acidity for proper leavening. (For more information, refer to baking powder vs baking soda if desired.) Adding a hint of espresso powder and hot coffee further intensifies the chocolate flavor. Rest assured, the cake won’t taste like coffee; instead, these ingredients deepen the richness of the dark chocolate flavor. If preferred, you can omit the espresso powder and substitute hot coffee with hot water.
Why use hot liquid? The heat encourages the cocoa powder to fully bloom and dissolve, enhancing its flavor.
Chocolate chips elevate the chocolatey goodness to new heights and, as mentioned earlier, they also contribute to an exceptional texture. Before folding them into the batter, coat the chocolate chips lightly in flour.
Smooth Peanut Butter Frosting
I’ve tweaked my traditional creamy peanut butter frosting recipe to ensure it’s just the right amount for this cake. You’ll need 5 simple ingredients:
- Butter
- Peanut Butter: Opt for the standard variety, such as Jif or Skippy, instead of natural peanut butter.
- Confectioners’ Sugar: You’ll appreciate that this recipe calls for less than 2 cups of confectioners’ sugar, a significant reduction compared to the usual 6 or 7 cups required for buttercream on a tall layer cake.
- Heavy Cream: This ingredient is also necessary for the chocolate ganache.
- Vanilla Extract
This recipe yields approximately 3.5–4 cups (about 850g) of frosting, which is ample for filling, crumb-coating, and basic piping on the exterior. Packed with nearly 2 cups of peanut butter, this frosting boasts an irresistible peanut butter flavor that’s simply unparalleled. There’s no better way to make it.
Simple 2-Ingredient Chocolate Ganache
I’ll keep the details brief on how to prepare the ganache since I have a comprehensive tutorial available for you. All you need are two ingredients: chopped semi-sweet baking chocolate (approximately 56–60% cacao) and warm heavy cream.
1 Success Tip: Allow the ganache to thicken for 20–30 minutes before pouring or spooning it onto the cake. Conveniently, this aligns with the time needed for the crumb-coated cake to chill.
Applying the ganache to a chilled cake aids in its setting or solidification, reducing the risk of major drips or messy spills.
How to Assemble and Decorate the Chocolate Peanut Butter Cake
I believe in keeping things simple. Here’s how I assemble and decorate this stunning cake:
Assembling:
- Place the bottom cooled cake layer on your cake stand or serving plate. Using a large icing spatula or small offset spatula, evenly spread about 1 cup of peanut butter frosting over the top.
- Add the second cake layer and repeat the process, spreading another cup of frosting evenly.
- Place the third cake layer on top and apply a thin layer of peanut butter frosting on the top and around the sides as a crumb coat. Use a bench scraper to smooth it out.
- Refrigerate the cake for at least 30 minutes and up to 3 hours to allow the crumb coat to set.
Decorating:
- Pour the slightly cooled chocolate ganache over the top of the cake. Once again, use a bench scraper to smooth it out around the sides.
- Fill a piping bag (either reusable or disposable) with the remaining peanut butter frosting and pipe along the edges of the cake. I recommend using a Wilton 1M tip for the piped detail.
- For an extra indulgent touch, consider garnishing this chocolate peanut butter masterpiece with peanut butter cups, if desired.

Peanut butter chocolate cake
Description
Indulge in the decadence of this ultra-moist chocolate peanut butter cake, where luscious chocolate layers meet velvety peanut butter frosting and a silky chocolate ganache. Ensure both the crumb-coated cake and ganache are adequately chilled before assembling and decorating the cake. Refer to the recipe Notes for additional insights into certain ingredients.
Ingredients
Peanut Butter Frosting
Chocolate Ganache
Instructions
-
Preheat the oven to 350°F (177°C). Grease three 9-inch cake pans, line them with parchment paper rounds, then grease the parchment paper. The parchment paper ensures easy release of the cakes from the pans. (For visual assistance, refer to this video and post on using parchment paper rounds for cakes.)
-
Prepare the cake batter: In a large bowl, whisk together the flour, cocoa powder, sugar, baking soda, baking powder, salt, and espresso powder (if using). Set aside. In another bowl, mix the oil, eggs, and sour cream together using a handheld or stand mixer fitted with a whisk attachment, or simply use a whisk, until combined. Add the buttermilk and vanilla, and beat until well combined. Pour the wet ingredients into the dry ingredients, add the hot water or coffee, and whisk or beat on low speed until the batter is fully combined. Fold in the flour-coated chocolate chips. The batter will be thin with some air bubbles on the surface, which is normal. You should have approximately 6–6.5 cups of batter, or around 1400g.
-
Divide the batter evenly between the prepared pans. Bake for about 24–26 minutes, checking for doneness with a toothpick inserted into the center. The cakes are ready when the toothpick comes out clean.
-
Remove the cakes from the oven and place them on a wire rack to cool completely in the pans. It's normal for the cakes to slightly sink in the middle as they cool.
-
While the cakes cool, prepare the peanut butter frosting: Using a handheld or stand mixer fitted with a paddle attachment, beat the butter on medium-high speed until creamy and smooth, about 2 minutes. Scrape down the sides and bottom of the bowl as needed. Add the peanut butter and beat until completely combined, about 1–2 minutes. Scrape down the sides and bottom of the bowl as needed. The mixture will be thin. Add confectioners’ sugar, vanilla extract, and salt, then gradually pour in the heavy cream with the mixer running on low speed. Once all the cream has been added, increase the mixer speed to medium-high and beat for 1–2 minutes until fully combined and creamy. If the frosting seems too thin, add up to 1/4 cup more confectioners’ sugar. You should end up with about 3.5–4 cups (850g) of peanut butter frosting, which is enough for filling, crumb coating, and a little piping on top.
-
Assemble the cake and apply the crumb coat: Place one cake layer on your cake stand, turntable, or serving plate. Using a large icing spatula or small offset spatula, evenly spread about 1 cup of peanut butter frosting over the top. Repeat with the second and third cake layers, spreading 1 cup of frosting between each layer. Then, spread a thin layer of frosting on the top and around the sides of the cake as a crumb coat. Use a bench scraper to smooth out the crumb coat. Chill the cake, uncovered, in the refrigerator for at least 30 minutes and up to 3 hours to set the crumb coat.
-
Serving
While the crumb coat sets, prepare the chocolate ganache: Place finely chopped chocolate in a medium heat-proof bowl. Heat the cream in a small saucepan over medium heat until it begins to gently simmer (avoid boiling). Pour the hot cream over the chopped chocolate and let it sit for 2–3 minutes to soften the chocolate. Slowly stir with a metal spoon or small rubber spatula until the chocolate has melted and the mixture is smooth. If needed, chill the ganache for 20-30 minutes in the refrigerator to thicken before spreading it over the chilled crumb-coated cake.
-
Pour or spoon the thickened ganache over the chilled cake. Smooth the top with an icing spatula and the sides with a bench scraper. Optionally, pipe the remaining peanut butter frosting around the edge of the cake using a Wilton 1M piping tip. Garnish with peanut butter cups, if desired. Serve the cake immediately or chill it, uncovered, for up to 4–6 hours before serving. The cake can be served at room temperature or chilled.
-
Store any leftover cake tightly covered in the refrigerator for up to 5 days. Consider using a cake carrier for storing and transporting.
Serving Size 14
Servings 1
- Amount Per Serving
- Calories 500kcal
- % Daily Value *
- Total Fat 30g47%
- Saturated Fat 10g50%
- Cholesterol 70mg24%
- Sodium 400mg17%
- Total Carbohydrate 60g20%
- Dietary Fiber 5g20%
- Sugars 39.99g
- Protein 10g20%
* Percent Daily Values are based on a 2,000 calorie diet. Your daily value may be higher or lower depending on your calorie needs.
Note
Make Ahead & Freezing Instructions
You can prepare the cake through step 4 in advance. Wrap the individual baked and cooled cake layers tightly and refrigerate for up to 2 days or freeze for up to 3 months. Bring them to room temperature before proceeding with step 5. Additionally, you can prepare the peanut butter frosting ahead of time. Cover and refrigerate it for up to 3 days, then bring it to room temperature before use. If necessary, beat in a little more room-temperature heavy cream to thin it out. Similarly, the chocolate ganache can also be prepared in advance. Refrigerate the prepared ganache for up to 3 days, then bring it to room temperature before spreading it onto the cake. Frosted cake freezes well for up to 3 months. Thaw it overnight in the refrigerator before bringing it to room temperature or serving it cold.
Special Tools (affiliate links)
For this recipe, you will need 9-inch cake pans, a glass mixing bowl, a whisk, an electric mixer (handheld or stand), large icing spatulas and/or small offset spatulas, a cake turntable, cake stand, or serving platter, a bench scraper, piping bags (disposable or reusable), a Wilton 1M piping tip, and a cake carrier for storing.
Cocoa Powder
Ensure you use natural cocoa powder for this recipe as it provides the necessary acidity. Do not use Dutch-process cocoa powder.
Espresso Powder/Coffee
Espresso powder and coffee deepen the chocolate flavor without imparting a coffee taste to the cake. I highly recommend using them both. However, if you prefer, you can omit the espresso powder and substitute extra hot water for the hot coffee.
Sour Cream
If you don't have sour cream, you can use plain yogurt as a substitute. However, keep in mind that the cake may not taste as rich.
Buttermilk
Buttermilk is essential for this recipe. You can make your own DIY version by combining 1 teaspoon of white vinegar or lemon juice with enough whole milk to reach 1/2 cup. Let it sit for 5 minutes before using it in the recipe.
Peanut Butter
To ensure the frosting maintains its consistency and doesn't become too thin or oily, use processed creamy peanut butter such as Jif or Skippy.
Why Room Temperature?
Bringing all refrigerated ingredients to room temperature ensures that the batter and frosting mix together easily and evenly, resulting in a smoother texture. Read more about the importance of room-temperature ingredients here.
Chocolate Ganache
For the best results, use high-quality dark or semi-sweet chocolate baking bars instead of chocolate chips, as they melt more smoothly. Look for brands like Bakers or Ghirardelli labeled semi-sweet (56% cacao), available in 4-ounce (113g) bars.
I haven’t tried this before but yours looks so pretty and attractive. Maybe this time I will give it a try. Thank you!