
This chocolate cake recipe is hands down my favorite. It yields a flawless three-layer 6-inch chocolate cake, and the best part? It’s incredibly easy to make! Be sure to visit the post for step-by-step photos detailing each stage, as well as information on which other cake pan sizes you can use for this recipe.
The cake is prepared using the basic creaming method. First, butter and sugar are whipped together, then oil is incorporated, followed by eggs and sour cream. Finally, the dry ingredients and milk are added alternately until fully combined. And there you have it – a delicious chocolate cake ready to enjoy!
Creating homemade salted caramel sauce may seem daunting, but fear not! I’ve provided detailed step-by-step instructions in my post on making homemade salted caramel sauce. Simply follow the steps meticulously, and you’ll achieve perfect results every time!
You might be wondering if you can use store-bought caramel sauce instead. The short answer is yes. However, I can’t guarantee the quality of any store-bought caramel sauce. I’ve never found any store-bought versions that come close to the deliciousness of homemade caramel sauce. It’s just something I wouldn’t compromise on!
Let’s dive into the best part! As mentioned earlier, I created this frosting using Sweetened Condensed Milk, and it truly elevates the frosting to a whole new level. It’s incredibly smooth, boasting just the right blend of chocolate flavor and creamy sweetness. The crucial step in making this frosting is to ensure that the butter is whipped thoroughly before gradually incorporating the sweetened condensed milk. Take your time adding it in slowly, and remember to scrape the bottom and sides of the bowl as needed.
Let’s dive into assembling the chocolate caramel cake!
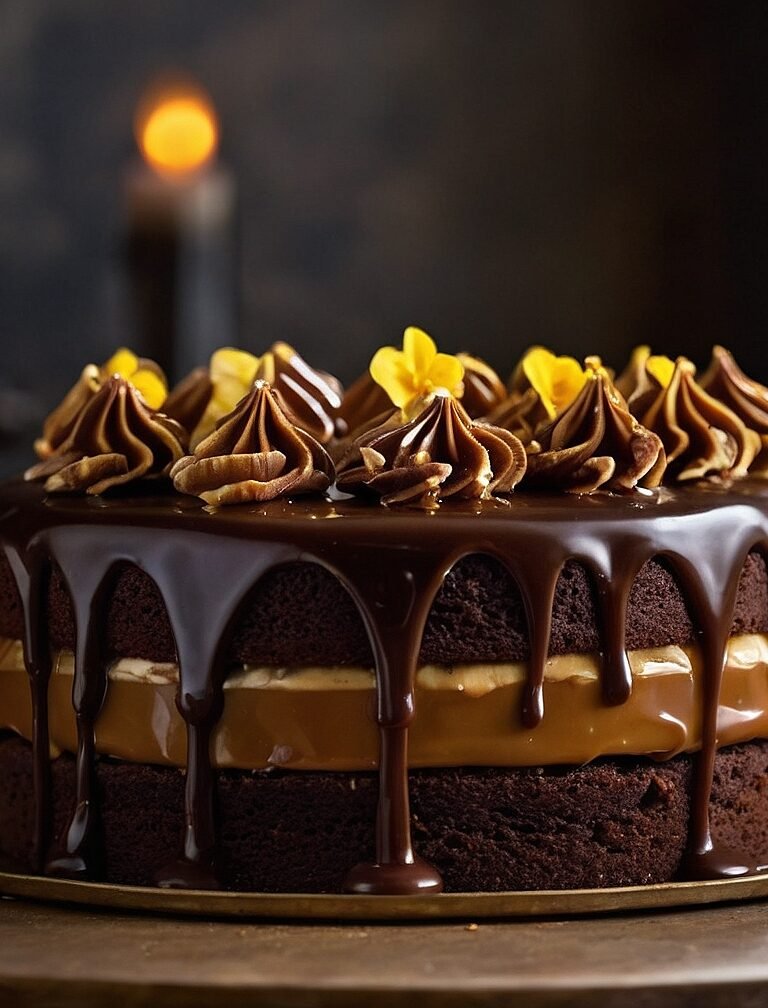
We all know that we eat with our eyes first and that dripping caramel sauce is likely making your mouth water. Am I right?! Here’s a step-by-step guide to ensure your cake looks as good as it tastes!
Start by making the salted caramel sauce, as it takes the longest to cool. Ensure it cools completely to room temperature, or you can refrigerate it for a bit if it seems too thin.
While the caramel cools, allow the cakes to cool in the pans for a few minutes before carefully inverting them onto a tea towel or cooling rack to cool completely.
Once both the cake and caramel have cooled, prepare the frosting. Pipe a border around the edge of the cake using a piping bag; this will create a barrier to prevent the caramel from oozing out. Then, generously spread caramel sauce in the center and pipe another layer of frosting on top of the caramel. Use an offset spatula to smooth out the frosting, then refrigerate the cake for 15-20 minutes before adding the next cake layer.
Skipping the refrigeration may result in the frosting and caramel squeezing out between the cake layers, potentially causing the cake to tip over once assembled. Repeat this process for the second cake layer, then refrigerate the cake for an additional 30 minutes after assembly.
After the cake has set in the fridge, finish frosting the outside and drizzle extra caramel sauce on top for a decadent finish. Enjoy!
Achieving the Oozing Caramel Effect
If you refrigerate the cake longer than I did, the caramel, cake, and frosting will firm up as they become colder. I opted to capture photographs while they were still fresh, just before they reached a colder state. As I photographed, the caramel began to warm up, resulting in a delightful oozing effect when I sliced the cake.
My room temperature was approximately 70°F, so I had to work swiftly to capture these shots before the cake became too unstable and risked toppling over. I noticed it starting to become less stable at room temperature after about 20-30 minutes. However, if you refrigerate the cake beforehand and refrain from slicing it fresh, it should remain stable for much longer.
Preparation in Advance
If preparing everything in one day seems overwhelming, you can make the caramel sauce ahead of time. It can be stored in an airtight container in the refrigerator for 2-3 weeks. Before using, allow it to come to room temperature for at least an hour.
You can also make the cake in advance. While I prefer not to make it more than one day ahead, if necessary, it can be made up to a week early. Individually wrap each cake layer in plastic wrap, then place them in a freezer bag and freeze.
I wouldn’t recommend preparing the frosting ahead of time since it’s quick to make and would require re-whipping before use anyway.
Storage of Assembled Cake
If the cake has not been sliced, store it in the refrigerator as is. If it’s already sliced, cover any exposed areas with plastic wrap and place the cut slices in an airtight container. Refrigerate for up to a week.
For freezing, slice the cake and wrap each slice tightly in plastic wrap or place them closely together in an airtight container to prevent freezer burn. Ensure all air is removed from the freezer bag before sealing it.
Nutrition
| Amount Per Serving: | |
|---|---|
| CALORIES: | 406 |
| TOTAL FAT: | 33g |
| SATURATED FAT: | 19g |
| TRANS FAT: | 1g |
| UNSATURATED FAT: | 10g |
| CHOLESTEROL: | 136mg |
| SODIUM: | 484mg |
| CARBOHYDRATES: | 23g |
| FIBER: | 1g |
| SUGAR: | 4g |
| PROTEIN: | 6g |

Chocolate Caramel Cake
Description
This chocolate cake recipe is hands down my favorite. It yields a flawless three-layer 6-inch chocolate cake, and the best part? It's incredibly easy to make! Be sure to visit the post for step-by-step photos detailing each stage, as well as information on which other cake pan sizes you can use for this recipe.
Ingredients
Chocolate cake
Salted Caramel Sauce
Chocolate Sweetened Condensed Milk Frosting
Instructions
Salted Caramel Sauce
-
In a medium-sized heavy-bottom saucepan, combine the sugar and water. Swirl the pan to ensure the sugar is fully immersed in the water. Place the saucepan over medium heat and allow the sugar to completely dissolve in the water, gently swirling the pan occasionally.
-
Once the sugar and water reach a simmer, reduce the heat to low and cover the pan with a lid. Allow the mixture to simmer until it begins to darken to a light amber color, which typically takes about 10 minutes. Remember to remove the lid and check the color every minute or so.
-
Avoid stirring the mixture with any utensils, but you can gently swirl the pan every couple of minutes. If there are crystallized sugar pieces on the sides of the pan, the steam from the lid should dissolve them. If not, you can use a pastry brush moistened with water to brush them away.
-
Once the sugar reaches a dark amber color, remove the pan from the heat. Stir in the butter until melted, then add the heavy cream, whisking until the caramel is smooth.
-
Transfer the caramel sauce to a heatproof jar and stir in the salt and vanilla extract.
-
Allow the caramel sauce to cool until it's no longer piping hot, approximately one hour. Refrigerate until the caramel is set.
6 Inch Chocolate Cake
-
To begin, ensure all your ingredients are at room temperature. Preheat the oven to 350°F (177°C) for convection (or 325°F/163°C for conventional baking). Grease and line three 6-inch cake pans with baking spray and parchment paper.
-
In a medium bowl, whisk together the flour, cocoa powder, baking powder, and salt until evenly distributed. Set aside.
-
In a large bowl, combine the room-temperature butter and granulated sugar. Use an electric mixer with the whisk attachment to beat them for 1-2 minutes. Then, add the oil and continue beating for another 1-2 minutes.
-
Add the eggs, one at a time, beating on medium speed until each egg is fully incorporated, about 30-60 seconds between each addition. Mix in the sour cream and vanilla until just combined.
-
Gradually add half of the dry ingredients to the batter. Turn the mixer to low speed and slowly stream in the milk, followed by the remaining dry ingredients.
-
Divide the batter evenly among the three prepared cake pans, pouring about 14 ounces into each pan. Bake for 30-35 minutes. The cakes are done when they release from the edges of the pan and spring back when lightly pressed in the center.
-
Remove the cakes from the oven and invert them onto a tea towel or cooling rack. Allow them to cool completely before frosting.
Chocolate Frosting
-
To prepare the frosting, use a stand mixer fitted with the whisk attachment and whip the butter at full speed for 10 minutes, or until it becomes pale and fluffy. Remember to scrape down the bottom and sides of the bowl every few minutes.
-
Reduce the speed to medium and gradually pour in the Eagle Brand Sweetened Condensed Milk, ensuring to scrape the bottom and sides of the bowl as needed. Add the cocoa powder and vanilla, and beat until thoroughly combined. If the frosting is too soft, refrigerate it for about 30 minutes, stirring it every 10 minutes or so to ensure even cooling.
-
Transfer the frosting into a piping bag fitted with a round tip. Pipe a border of icing along the edge of the first cake layer. Fill the border with a layer of cooled caramel sauce, then pipe another thin layer of frosting on top of the caramel.
-
Refrigerate the cake for 15 minutes and repeat the process with the second layer. Afterward, refrigerate the cake for another 15 minutes before placing the final layer on top. Chill the assembled cake for 30-60 minutes before frosting the exterior.
-
Use the remaining frosting to cover the outside of the cake. Drizzle extra caramel sauce on top for decoration. Serve immediately or store the cake in the refrigerator.
Serving Size 1
Servings 10
- Amount Per Serving
- Calories 406kcal
- % Daily Value *
- Total Fat 33g51%
- Saturated Fat 19g95%
- Trans Fat 1g
- Cholesterol 136mg46%
- Sodium 483.99mg21%
- Total Carbohydrate 23g8%
- Dietary Fiber 1g4%
- Sugars 4g
- Protein 6g12%
* Percent Daily Values are based on a 2,000 calorie diet. Your daily value may be higher or lower depending on your calorie needs.
They look so cute and pretty! And thank you for the recipe, can’t wait to try!